Wednesday, October 24, 2012

Atlantic Salmon with Pomegranate-Balsamic Glaze

The Salmon recipe and the Pomegranate-Balsamic Glaze recipe are from Cook's Illustrated.

For the Pomegranate-Balsamic Glaze

Ingredients:
3 tablespoons light brown sugar
3 tablespoons pomegranate juice
2 tablespoons balsamic vinegar
1 tablespoon whole grain mustard
1 teaspoon cornstarch
pinch cayenne pepper.

Instructions:
1.  Whisk all ingredients together in small saucepan
2.  Bring to boil over medium-high heat
3.  Simmer until thickened - about 1 minute
4.  Remove from heat and cover to keep warm
5.  Set aside until needed for the salmon

Mark's Notes - 
I substituted white sugar for the brown sugar.
Pomegranate juice is incredibly difficult to find.  I used Ocean Spray's Cranberry-Pomegranate juice.
Cayenne pepper = Ground red pepper (I didn't know that).

Salmon:
Ingredients:
1 teaspoon light brown sugar
1/2 teaspoon salt
1/4 teaspoon cornstarch
4 center-cut skin-on salmon fillets (6-8 ounces each)
Ground black pepper
1 teaspoon vegetable oil
1 recipe glaze (see above)

Instructions:
1.  Adjust oven rack to middle and heat to 300 degrees.
2.  Combine brown sugar, salt, and cornstarch in a small bowl.
3.  Pat salmon dry with a paper towel.
4.  Season salmon with the black pepper.
5.  Sprinkle brown sugar mixture over top of flesh side of salmon.
6.  Rub in mixture to distribute.
7.  Heat oil in 12 inch skillet over medium-high heat until just smoking.
8,  Place salmon flesh side down in skillet.
9.  Cook until well browned (about 1 minute)
10.  Using tongs, carefully flip salmon fillets and cook on skin side for 1 minute.
11.  Remove skillet from heat.
12.  Spoon glaze evenly over flesh side of the salmon fillets.
13.  Transfer salmon fillets to a rimmed baking sheet.
14.  Bake in oven until thickest parts of fillets reach 125 degrees (about 7-10 minutes).
15.  Enjoy!

Mark's Notes:
1.  Again, I don't use brown sugar and used regular white sugar.
2.  If using an oven-safe skillet, then after glazing the salmon, the skillet can go directly into the oven (skipping step 13).
3.  If you notice "white stuff" that forms on salmon - this is a protein known as albumin.  According to Cook's Illustrated - 
"When the muscle fibers in the fish are heated, they contract, pushing the moisture-filled albumin to the surface of the flesh.  Once this protein reaches temperatures between 140 and 150 degrees, its moisture is squeezed out, and it congeals and turns white.  Not only does the white albumin detract from the salmon's appearance, but its formation indicates a loss of moisture in the fish.  Cooking salmon at a low temperature can mitigate albumin coagulation.  Gentle cooking results in less intense muscle contractions, so that less of the albumin moves to the surface of the fish and more of it stays trapped in the flesh.  The fish not only stays more moist, but it looks better too."

Mark's Amusing Story:
Trish was complaining about all the baking that I do.  She said I should try baking something healthy that she can eat.  She eats lots of fish.  So, I searched through Cook's Illustrated recipes for fish and found one that I liked.  I called Trish and told her I was making dinner tonight and that it was a surprise.  I got the fresh salmon from Mitchell's Fish Market too.  It was really really good.
Saturday, October 6, 2012

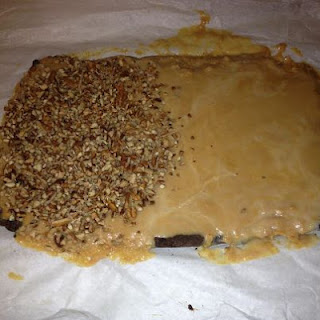
Peanut Butter and Dark Chocolate Fudge

Peanut Butter and Dark Chocolate Fudge

I found the original recipe in the Cooking Light magazine.  I'm going to list the recipe as it was published first, then I'll explain all the modifications I made.

Ingredients:
1 (14 ounce) can fat-free sweetened condensed milk, divided.
3/4 cup semisweet chocolate chips
2 tablespoons unsweetened dark cocoa powder
1/4 teaspoon instant coffee granules
1 teaspoon vanilla extract, divided
3/4 cup peanut butter chips
1 tablespoon peanut butter
1/4 cup salt, dry-roasted peanuts, coarsely chopped

Instructions:
1.  Line an 8 inch square baking dish with wax paper.
2.  Place 9 tablespoons milk in microwave safe bowl.
3.  Add chocolate chips, cocoa, and coffee.
4.  Microwave at high for 1 minute or until melted.
5.  Stir in 1/2 teaspoon vanilla.
6.  Spread into prepared pan.
7.  Combine the remaining milk, peanut butter chips, and peanut butter in microwave safe bowl.
8.  Microwave on high for 1 minute or until melted.
9.  Stir in remaining 1/2 teaspoon vanilla.
10.  Spread evenly over chocolate layer.
11.  Sprinkle with peanuts.
12.  Cover.
13.  Chill for 2 hours.
14.  Enjoy.

Mark's Notes:
1.  I did not use the coffee.
2.  I doubled everything else.
3.  I used a 9 x 13 baking pan rather than an 8 x 8 baking pan.
4.  I did not use peanuts.  I used chopped pecans. I sprinkled half with pecans for Trish and I.  I left the other side plain for the kids.
5.  After placing in refrigerator, I realized 1 hour later that I forgot to cover it.  So, I covered it.
6.  Then I realized when it was done that I used parchment paper instead of wax paper.  In the refrigerator, I don't think it will make a huge difference whether wax paper or parchment paper is used.  In the oven, it makes a huge difference, parchment paper needs to be used in the oven.
7.  Here is the link to the Cooking Light recipe:

Monday, October 1, 2012

Less is More: Cook's Illustrated Lighter Brownies

Less is More:  Cook's Illustrated Lighter Brownies
(this recipe was originally published in Cook's Illustrated's "The Best Light Recipe")

Ingredients:
1/2 cup unbleached flour (2 1/2 ounces)
1/2 teaspoon baking powder
2 tablespoons Dutch processed cocoa powder
1 tablespoon warm water
1 tablespoon vanilla extract
3/8 teaspoon instant espresso powder
2 tablespoons unsalted butter
3 ounces semisweet chocolate - chopped fine (do not use semi-sweet chocolate chips.  Use semi-sweet chocolate baking bars)
1/2 cup sugar (3 1/2 ounces)
1/8 teaspoon salt
1 large egg, lightly beaten

The parentheses information behind the sugar and flour is the weight.  According to Cook's Illustrated's Cook Book, it is more accurate to measure sugar and flour by weight rather than going by lines on a measuring cup.

Instructions:
1.  Whisk flour and baking powder together in bowl then set aside.
2.  Whisk cocoa, espresso, vanilla, and warm water together then set aside.
3.  Microwave chocolate and butter together in medium sized microwavable safe bowl at 50% power for about 1 minute or so until melted.
4.  Whisk the mixture until smooth.
5.  Whisk in the sugar and salt in the chocolate/butter mix until incorporated.
6.  Whisk in the cocoa mixture
7.  Whisk in the egg.
8.  Stir in the flour mixture until just incorporated.
9.  Double line an 8 x 8 baking pan with parchment paper or foil lightly coated with vegetable spray.
9.  Pour batter into prepared pan.
10.  Bake for 20-25 minutes at 350 degrees.  Rotate half way through.  Do not over bake.  Insert toothpick - toothpick should come out with just a few crumbs.
11.  Let cool in pans for 1 hour.
12.  Lift brownies out of pan.
13.  Cut into 12 brownies
14.  Enjoy.

Calories - 130
Fat - 5 g
Sat fat - 2.5 g
Cholesterol - 25 mg
Carb - 19 g
Protein - 2 g
Fiber - 1 g
Sodium - 55 mg

We are having a brownie bake-off at work to raise money for charity.  We have the brownie bake-off every year.  This is my second year competing.  Last year, I made Cook's Illustrated Turtle Brownies and although I did not win, I received many compliments.  This year, I am emphasizing a better and healthier brownie by focusing on a lot less calories.  130 calories per brownie is difficult to beat.  I'm going to be advertising how many calories my brownies have (or don't have).  Hopefully, that will get me quite a few votes.  Based on my research, I guess it is quite common to add in espresso to maintain a chocolate brownie flavor without adding in a lot of calories.  

So, this is what I am entering this year.  All money raised at this event will be donated to charity and the winner gets to choose the charity.  It will be lots of fun.  I'll add P.S. to this post later and tell everyone how it went.

Monday, September 10, 2012

Really Good Pumpkin Bread


Ingredients:

Topping - 
5 tablespoons brown sugar
1 tablespoon all purpose flour
1 tablespoon unsalted butter, softened
1 teaspoon ground cinnamon
1/8 teaspoon salt

Bread - 
2 cups all-purpose flour
1 1/2 teaspoons baking powder
1/2 teaspoon baking soda
1 (15 ounce) can unsweetened pumpkin puree
1 teaspoon salt
1 1/2 teaspoons ground cinnamon
1/4 teaspoon nutmeg
1/8 teaspoon ground cloves
1 cup granulated sugar
1 cup light brown sugar
1/2 cup vegetable oil
4 ounces cream cheese, cut into 12 pieces
1/4 cup buttermilk
4 eggs
1 cup walnuts, toasted and chopped fine (optional)

Instructions:
For the topping - 
1.  Using fingers, mix all ingredients together in bowl until well combined and topping resembles wet sand.  
2.  Set aside.

For the bread - 
1.  Pre-heat oven to 350 degrees.
2.  Whisk flour, baking powder, and baking soda together in bowl.
3.  Combine pumpkin puree, salt, cinnamon, nutmeg, and cloves in large saucepan over medium heat.
4.  Stir constantly and cook for 6-8 minutes until reduced to 1 1/2 cups.
5.  Remove pot from heat.
6.  Stir in granulated sugar, brown sugar, oil, and cream cheese until combined.
7.  Let mixture stand for 5 minutes.
8.  Whisk until no visible pieces of cream cheese remain.
9.  In a separate bowl, whisk together eggs and buttermilk.
10.  Add egg mixture to pumpkin mixture and whisk to combine.
11.  Fold flour mixture into pumpkin mixture until combined.
12.  Fold walnuts into batter (optional).
13.  Grease two 8.5 x 4.5 loaf pans.
14.  Evenly pour batter into prepared pans.
15.  Sprinkle topping evenly over top of each loaf.
16.  Bake until skewer inserted in center of loaves comes out clean - about 45 to 50 minutes.  (mine had to cook closer to 60 minutes)
17.  Let breads cool in pans on wire rack for 20 minutes.
18.  Remove breads from pans and let cool for at least 1.5 hours.
19.  Serve warm or at room temperature.

Mark's notes - 

1.  Essentially, you will have bowl 1 with the topping mixture.  You will have bowl 2 with the flour mixture.  You will have bowl 3 with the pumpkin puree mixture.  You will have bowl 4 with the egg mixture.  At the end, bowl 4 gets dumped into bowl 3 and whisked.  Then bowl 2 gets folded into bowl 3.  Pour bowl 3 into prepared loaf pans and evenly sprinkle the toppings from bowl 1 over both loaves.

2.  The original instructions said to cook 45-50 minutes.  I had to cook mine closer to 60-65 minutes to cook through.

4.  I did not use any brown sugar.  I substituted all brown sugar with granulated sugar.

5.  I did not use the walnuts.  Abby loves pumpkin pie but does not like nuts, and so I left those out.  Just a personal preference for Abby.

6.  I did not use buttermilk.  I used 1/4 cup yogurt.

7.  I did not use the ground cloves.  I don't like ground cloves and I don't have them in my spice collection, and so I always leave it out.  Just a personal preference of mine.  (Need to add spice rack to my Christmas list - I had one.  I don't know what happened to it unfortunately).

Attempt # 1 - please feel free to smile, laugh, giggle, etc. 

I do not have two 8.5 x 4.5 loaf pans.  I have two 9 x 5 loaf pans. One was in the dishwasher from the zucchini bread.  I decided to pour the entire batter into one 9 x 5 loaf pan.  I was thinking, 'Well, this works for my banana bread.'  Wow.  Big mistake.  Disaster in progress.  I turned on the oven light and saw it rising, rising, rising, and about to spill over.  I pulled it out after 50 minutes, it was not done.  I trimmed off some of the edges so it wouldn't just fall off in the oven.  I put it back in the oven for another 15 minutes.  Still not cooked through.  Another 15 minutes perhaps.  Okay.  Just 15 more then it should be cooked through definitely.  All I managed to do was burn the top, and it never cooked through.  I had to throw it all away and try again, and refer to Mark's Kitchen Rules #2, #3, #5, and almost #8.

Here is a picture of the end result from the failed single loaf:

Attempt #2
The next day, determined to get this right, I went to the grocery store, got another can of pumpkin puree, and tried again.  I followed the instructions.  I used two 9 x 5 loaf pans.  (I need to add two 8.5 x 4.5 loaf pans to my Christmas list).  Anyway, here is a picture of the end result:


Happy baking!


Lam, Lan. (2012, September and October). Really Good Pumpkin Bread.  Cook’s Illustrated, p.24.

Friday, September 7, 2012

Zucchini Bread

Today, I made a Zucchini Bread for the first time.  I used the recipe from Cook's Illustrated Cookbook.

Ingredients:
2 small zucchini
2 cups flour
1 teaspoon baking soda
1 teaspoon baking powder
1 teaspoon ground cinnamon
1 teaspoon ground allspice
1/2 teaspoon salt
1 1/2 cups sugar
6 tablespoon unsalted butter - melted and cooled
2 large eggs
1/4 cup plain whole-milk or low-fat yogurt
1 tablespoon lemon juice
1/2 cup pecans or walnuts, toasted and chopped

Instructions:
1.  Pre-heat oven to 350 degrees.
2.  Wash and shred 2 small zucchini - use smaller zucchinis as these have smaller and drier seeds.  If using larger zucchini, cut in half and scoop the seeds out, then shred.  Shred zucchinis using the large holes of a box grater.
3.  Squeeze shredded zucchini between several pieces of paper towels to get rid of extra moisture.
4.  In large bowl, whisk flour, baking soda, baking powder, ground cinnamon, allspice, and salt.
5.  In medium bowl, whisk sugar, melted butter, eggs, yogurt, and lemon juice together until smooth.
6.  Gently fold shredded zucchini and yogurt mixture into the flour mixture with a rubber spatula until just combined - do not over mix.  Repeat - do not over mix.  
7.  Gently fold in pecans.
8.  Grease loaf pan.
9.  Pour batter into loaf pan.  
10.  Bake until golden brown - about 1 hour - rotating half way through.
11.  Let loaf cool for 10 minutes, then let cool on wire rack for 1 hour.

Mark's Notes - 
1.  Before I even started this recipe, I researched on ehow.com on how to shred a zucchini. I didn't know anything about zucchinis such as do you need to peel the skin off like a banana, can you eat the seeds, etc.  Apparently, both are okay to eat, just cooking the seeds in the bread makes it quite bitter.  The skin is where all the healthy nutrients are.

2.  I did not have any allspice in the house and so I just substituted 1/4 teaspoon nutmeg because I like nutmeg and didn't feel like researching the super exact substitute for allspice.

3.  I used the yogurt rather than the whole milk.

4.  My first attempt and the bread collapsed.  I did a little research on this and quick breads will collapse due to over stirring.  That's why I put in the instructions the emphasis on not over stirring.

5.  I forgot to let the butter cool before mixing that in, and that probably contributed to the bread collapsing as well.

6.  My wife, Trish, said it still turned out nummy.  So, that's always good.

7.  I have a couple more zucchinis in the kitchen so I can try another batch fairly soon, and hopefully, it won't collapse.

8.  I honestly believe that Banana Bread is just a little easier in that with bananas all you have to do is mash those up.  Peeling the zucchinis requires a little more effort but still worthwhile.

Friday, August 31, 2012

Hazelnut Chocolate Truffles

From Cook's Illustrated.  Published January 1, 2012.

Ingredients:

Ganache -
2 cups bittersweet chocolate, roughly chopped
1/2 cup heavy cream
2 tablespoons light corn syrup
1/2 teaspoon vanilla extract
Pinch salt
1 1/2 tablespoon unsalted butter, cut into 8 pieces and softened

Coating -
Dutch-processed cocoa
1 1/2 cups finely chopped hazelnuts

Instructions:
For the Ganache -
1.  Lightly coat 8-inch baking pan with vegetable oil spray.
2.  Make parchment sling - fold 2 long sheets of parchment so that they are as long as the baking pan.  Lay sheets of parchment in pan perpendicular to each other, with extra hanging over edges of pan.  Push parchment into corners and up sides of pan, smoothing flush to pan.
3.  Microwave dark chocolate chips in medium bowl at 50 percent power for 2-3 minutes while stirring occassionlly.  Set aside.
4.  Microwave cream in measuring cup until warm to touch - about 30 seconds.
5.  Stir corn syrup, vanilla, and salt into cream.
6.  Pour mixture over chocolate.
7.  Cover bowl with plastic wrap, set aside for 3 minutes.
8.  Stir with wooden spoon to combine.
9.  Stir in butter one piece at a time, until fully incorporated.
10.  Using a spatula, transfer ganache to prepared pan with the parchment paper and set aside at room temperature for 2 hours.
11.  Cover pan and transfer to refrigerator to chill for 2 hours and up to 2 days.

For the coating -
12.  Sift cocoa through fine mesh strainer into large bowl.
13.  Sift again into a large cake pan and set aside.
14.  Place chopped hazelnuts in another large cake pan and set aside.

Bringing it all together -
15.  Lift ganache from pan by gripping the overhanging parchment.
16.  Cut ganache into 64 1 inch squares - (8 rows by 8 rows).  If ganache cracks while cooking, let sit for 5-10 minutes and continue.
17.  Dust hands with cocoa powder and roll each square into a ball.
18.  Transfer balls to pan with cocoa coating and roll to evenly coat.
19.  Lightly shake truffles over cocoa pan, then roll in hazelnut pan. 
20.  Transfer coated truffles to airtight container and repeat until all ganache rolls are rolled and coated.
21.  Cover container and refrigerate for at least 2 hours and up to 1 week.
22.  Let truffles sit at room temperature for 5-10 minutes before serving.

Mark's Notes -
I have only made this once.  It turned out a bit dry with the first bite, then the second bite you were into the colder soft chocolate part and the contrast was interesting, but I think I messed up by coating it with too much cocoa powder. I didn't have the hazelnuts either the first time I made this.  I used the alternate listed below.  I'd like to try it with hazelnuts.

If you don't like nuts or hazelnuts then don't use those.  Instead mix in 1/4 cup confectioner's sugar in with the cocoa powder and sift.  Then roll the ganache in that cocoa/sugar mix for the coating.

....I also have absolutely no idea how to actually pronounce the word 'ganache'.  I'll look it up in the dictionary.

Thursday, August 30, 2012

Almond Butter Dark Chocolate Chip Cookies

Ingredients:
1 cup Almond Butter
1/3 or 1/2 cup honey (your choice - slightly sweeter with 1/2 cup)
1 egg
1 tablespoon Vanilla Extract
1/2 teaspoon Baking Soda
1/2 teaspoon salt
1 Tablespoon Flaxseed Meal (optional)
1/2 cup dark chocolate chips
2/3 cup unsweetened coconut

Instructions:
1.  Preheat oven to 350 degrees
2.  Oil baking sheets or line with parchment paper
3.  Stir together first 8 ingredients.  Mix well.  Make sure honey is fully incorporated.
4.  Add dark chocolate chips and coconut
5.  Scoop onto cookie sheets  - about 2 tablespoons for one cookie.
6.  Bake 10-13 minutes until lightly browned.

This will make about 20 cookies.

Mark's notes -
I did not use the flaxseed meal
I could not find unsweetened coconuts and so I used sweetened coconuts.
I learned that these flour free/sugar free/gluten free type of cookies can burn very quickly on you.  As soon as the cookies start turning a light brown, they are done.

Trish gave me this recipe to bake a batch before leaving on a weekend trip.  Everyone seemed to like them (although I did come close to baking these too long).  I also baked some blueberry banana bread for this trip as can be seen in the posted picture at the top.

This recipe is from the unrefined kitchen -

http://www.unrefinedkitchen.com/2011/08/10/almond-butter-dark-chocolate-chip-cookies/

Wednesday, August 29, 2012

French Toast Casserole

This recipe is from Disney Family Fun magazine -December/January 2012

Ingredients:
Challah, Brioche, or other firm white bread
1/4 to 1/2 cup packed brown sugar - see Mark's Notes
1 teaspoon cinnamon
8 large eggs
1 3/4 cups milk
2 teaspoons vanilla extract

Instructions:
1.  Grease 13x9 glass baking dish
2.  Slice bread into 12 (1 inch thick) slices, then cut each slice into 1 inch cubes
3.  In a small bowl combine brown sugar and cinnamon
4.  Arrange half the bread in a single layer in the prepared baking dish
5.  Sprinkle half the sugar mix evenly over the top.
6.  Add a second layer with the remaining bread.
7.  Sprinkle the remaining sugar over the top.
8.  In a large bowl, whisk together the eggs.  Add the milk and vanilla extract.  Whisk until well blended.
9.  Starting from the sides of the dish and working toward the center, pour the egg mixture evenly over the bread.  With a spatula, gently press down on the bread to coat it with the egg mixture.  Cover the dish with aluminum foil and refrigerate over night or at least 4 hours.
10.  Heat oven to 350 degrees.  Bake the casserole covered for 20 minutes, then remove the foil and continue baking until the casserole turns a light golden brown - about 30 minutes more.

Mark's Notes - 
I've never made this with brown sugar.  I always use white sugar.  1/2 cup white sugar makes it almost too sweet.  Try 1/4 cup white sugar.

The original recipe includes pecans or walnuts.  I never use these. If you would like to include these, then use 1/3 cup chopped pecans or walnuts and mix it in with step 3.

Mark's Story -
This is a personal favorite of mine to make when we have guests over.  You can make it the night before and just bake it in the oven the next morning.


I have provided the link to the original recipe from Disney Family Fun -

http://familyfun.go.com/recipes/french-toast-casserole-1030014/

Cooking Music

My Cooking Playlist:

Margaritaville by Jimmy Buffet
Scenes from an Italian Restaurant by Billy Joel
Dance of the Sugar Plum Fairy from the Nutcracker Suite by Tchaikovsky
Be Our Guest from Disney's Beauty and the Beast
Shortnin' Bread by Brent Lewis (really fun song for the kids)
Lollipop by The Chordettes
The Banana Boat Song by Harry Belafonte
Sugar and Spice by The Searchers
Hot Dog!... by They Might Be Giants - The Mickey Mouse Clubhouse
Boat Drinks by Jimmy Buffet
Hot Potato by The Wiggles
Memphis Soul Stew by King Curtis and the Kingpins
If I Knew You were coming I'd have baked you a cake by Georgia Gibbs
I've got a lovely bunch of coconuts by Freddy Martin
Sugar Sugar by The Archies
Margaritaville by Pickin O'n Series - Pickin' on Jimmy Buffet
Bang Bang by David Sanborn
Ice Cream by Sarah McLachlan
Strawberry Avalanche by Owl City
Georgia Peaches by Lauren Alaina
Yes, We Have No Bananas by Louis Prima
That's Amore by Dean Martin
Le Festin from Ratatouille
Ratatouille from Ratatouille
Souped Up from Ratatouille
Welcome to Gusteau's from Ratatouille
Banana Mango by Joe Satriani
Banana Mango 2 by Joe Satriani
"C" is for Cookie by Cookie Monster
Cheeseburgers in Paradise by Jimmy Buffet
Colette Shows Him Le Ropes from Ratatouille
End Creditouille from Ratatouille
Another Irish Drinking Song by The Minions
Cherry, Cherry by Neil Diamond
Coconut by Harry Nilsson
Potato Head Blues by Louis Armstrong
Sweetest Thing by U2
The Charlie Brown Suite:  Peppermint Patty by Vince Guaraldi
Everybody Eats When They Come To My House by Cab Calloway
Tossed Salad and Scrambled Eggs - Theme Song to Frasier


One could just listen to the entire soundtrack from Ratatouille.  I just added a few of my favorites to the playlist.

I also have a classical music playlist that I listen to as well.  There is a lot of Handel, Beethoven, Mozart, Vivaldi, George Gershwin, Saint-Saens, Bach, and many many others in that playlist.  When we sit down to eat and this music is still playing, Abby will say she feels like she is in a fancy restaurant.

I once had a rule where whoever was doing the cooking got to pick the music.  I put on Shania Twain.  Abby was running around with her hands over her ears, Miriam was sitting at the piano playing it as loudly as she could, even Trish put on some headphones while playing on her computer.  So, now I listen to either the classical music playlist or my cooking playlist. 

Berry Fool

Pazmino, David. “Berry Fool”
America’s Test Kitchen Best Ever Recipes

Ingredients –
2 quarts strawberries (about 2 pounds) – washed, dried, and hulled.
1 pint raspberries (or blueberries or blackberries)
½ cup; plus 4 tablespoons sugar
2 teaspoons unflavored gelatin
1 cup heavy cream
¼ cup sour cream
½ teaspoon vanilla extract
4 Carr’s Whole Wheat Crackers, finely crushed (about ¼ cup)
6 sprig fresh mint, for serving (optional)

1.
Process 1 quart of the strawberries, ½ pint raspberries, and ½ cup sugar in a food processor until the mixture is completely smooth (about 1 minute).

Strain the berry puree through a fine mesh strainer into a 4 cup liquid measuring cup - there will be about 2 ½ cups berry puree left over.

Transfer ½ cup of the berry puree to a small cup and sprinkle the gelatin over the top; stir until the gelatin is incorporated and let stand at least 5 minutes.

Heat the remaining 2 cups of the berry puree in a small saucepan until it begins to bubble (about 4 to 6 minutes).

Remove the saucepan from the heat and stir in the gelatin mixture to a medium bowl, cover with plastic wrap, and refrigerate until cold, about 2 hours.

2.
Meanwhile, chop the remaining 1 quart strawberries into rough ¼ inch pieces.
Toss the strawberries, remaining ½ pint raspberries, and 2 tablespoons of the sugar together in a medium bowl. Set aside for 1 hour.

3.
Place the heavy cream, sour cream, vanilla, and remaining 2 tablespoons sugar in the chilled bowl of a stand mixer. Beat at low speed until bubbles form, about 30 seconds. Increase the speed to medium and continue beating until the beaters leave a trail, about 30 seconds. Increase the speed to high; continue beating until the mixture has nearly doubled in volume and holds stiff peaks, about 30 seconds. Transfer 1/3 cup of the whipped cream mixture to a small bowl and set aside.

4.
Remove the thickened berry puree from the refrigerator and whisk until smooth. With the mixer running at medium speed, slowly add two-thirds of the puree to the whipped cream mixture; mix until incorporated, about 15 seconds.
Using a spatula, fold in the remaining thickened puree leaving streaks of puree.

5.
Transfer the uncooked berries to a fine mesh strainer; shake gently to remove any excess juice. Divide two-thirds of the berries evenly among 6 tall parfait or sundae glasses. Divide the creamy berry mixture evenly among the glasses, followed by the remaining uncooked berries. Top each glass with the reserved plain whipped cream texture. Sprinkle with the crushed crackers and garnish with the mint sprigs, if using.

Serve immediately.


Mark’s notes:
I only make this once a year around the 4th of July - this is my red, white, and blue dessert.  For me, it is quite involved and quite messy.

When I first made this, I was not able to serve it immediately.  I spent all morning making this, then I got to the end and read the 'Serve immediately' part.  I placed it in the freezer and left it there until after dinner. I took the glasses out 45 minutes before I served them and just let them thaw at room temperature.

Most people that I have made this for actually prefer the dessert to be frozen first rather than served right when it is ready.
Here is the link to America's Test Kitchen recipe for this.  There is also a video by America's Test Kitchen on how to make this.

http://www.americastestkitchen.com/recipes/detail.php?docid=13078&Extcode=N1NSPFA00


Really Good French Toast

Pazmino, David. (2009, January and February). Really Good French Toast.  Cook’s Illustrated, 24-25.

Ingredients:
8 large slices hearty white sandwich bread
1 ½ cup whole milk, warmed
3 large egg yolks
3 tablespoons light brown sugar
½ teaspoon ground cinnamon
2 tablespoons unsalted butter, melted
Plus 2 tablespoons for cooking
¼ teaspoon table salt
1 tablespoon vanilla extract

1. Adjust oven rack to middle position and heat to 300 degrees. Place bread on baking sheet and bake for 14-16 minutes – 7-8 minutes per side. Let cool for five minutes.

2. Whisk milk, yolks, sugar, cinnamon, 2 tablespoons melted butter, salt, and vanilla in large bowl until well blended. Transfer mixture to 13 by 9 inch baking pan.

3.  Heat 1/2 tablespoon butter in skillet over medium heat.

4. Soak bread in milk mixture until saturated but not falling apart – about 20 seconds per side.

5. Transfer to prepared skillet (the foaming butter should subside before adding soaked bread). 

6. Cook until golden brown, 3-4 minutes per side.  Transfer to plate or baking sheet to make room to cook more bread.

7. Repeat cooking with remaining bread, adding ½ tablespoon of butter for each batch.

Mark’s notes –
I have used skim milk instead of whole milk and it turned out well.
I have used white sugar instead of brown sugar and it turned out well
Recently, we've been using Pepperidge Farm Swirl bread - Brown Sugar Cinnamon. When using this type of bread, don't add the 1/2 teaspoon cinammon, and only use 1-2 tablespoon of white sugar rather than 3 tablespoons of brown sugar.  (and yes, I am technically baking with brown sugar as it is in the bread we are using here.)

Homemade Chocolate Hazelnut Spread

This recipe is from America's Test Kitchen

Ingredients:
2 cups hazelnuts
1 cup confectioner's sugar (or 1/2 cup for reduced sugar recipe)
1/3 cup cocoa powder (or 1/4 cup Dutch Processed Cocoa)
2 tablespoons hazelnut oil (or olive oil or vegetable oil)
1 teaspoon vanilla extract
1/8 teaspoon salt

1. Adjust oven rack to middle position and heat oven to 375 degrees. Place hazelnuts in single layer on rimmed baking sheet and roast until fragrant and dark brown, 12 to 15 minutes, rotating tray halfway through cooking. Transfer hazelnuts to medium bowl and set aside. When hazelnuts are cool enough to handle, overturn a second medium bowl and place on top of first bowl. Shake vigorously to remove skins.

2. Transfer peeled hazelnuts to food processor and process to consistency of smooth, loose paste, about 5 minutes, scraping down bowl as needed.  

How long you mix it will determine how 'runny' the final mixture is. If you want it less 'runny' then try 3-4 minutes rather than the full 5 minutes.

3. Add sugar, cocoa powder, oil, vanilla, and salt, and process until fully incorporated and mixture begins to loosen slightly and become glossy, about 2 minutes, scraping down bowl as needed.

4. Transfer spread to container with tight-fitting lid. Spread can be stored at room temperature or refrigerated for up to 1 month. 

It is slightly thicker if placed in refrigerator.

Mark's Updated Notes (3-26-14)
Abby (almost 10) has some minor acid reflux problems.  Store bought Nutella was upsetting her tummy.  So, I went back and made my own Nutella.  Although Nutella is trademark protected name so the generic name really is Chocolate Hazelnut Spread.

I reduced the confectioner's sugar from 1 cup to 1/2 cup.  I have reason to believe this would still turn out well with 1/4 cup.

I also reduced the amount of Cocoa used from 1/3 to 1/4.  Remember  - this could be even less, the cocoa is just there for flavor.  I also used Dutch Processed Cocoa as that is less acidic than regular cocoa.

Technical chemistry stuff - the Dutch Processed Cocoa is different from the natural cocoa in that it is less acidic.  The Dutch Process Cocoa is natural cocoa that has been alkalized to reduce the amount of acid in the chocolate.

FYI - Hazelnuts also go by the name of Filberts.  I bought some Filberts at Horrocks and actually baked them and removed the skins.  That was a time consuming and tedious task.  Just buy the bags of chopped hazelnuts at Kroger.  Meijer does carry a different brand of chopped hazelnuts but those for some reason won't blend in my mixer and the Kroger brand does.  Don't know why.  It's just the way things go sometimes.

Mark’s Notes –

I go to Kroger and buy two bags of chopped hazelnuts in their cooking section and that way I skip step 1 and go straight to dumping the chopped hazelnuts in the food processor.
In Step 2, I only blend it for 4 minutes
I actually use Olive Oil rather than Hazelnut Oil.  Vegetable oil or walnut oil can also be used.
If you don’t have 1 cup confectioner’s sugar, then just use ½ cup regular sugar.

Both Abby and Miriam love Nutella.  They will eat toast and Nutella for breakfast in the morning.  Then I found this recipe, and I started making my own. 

Visit AmericasTestKitchenFeed.com for fantastic recipes, cooking tips, gear reviews, and plenty more.

Ultimate Banana Bread

Ultimate Banana Bread or Extreme Banana Bread (based on the Cook's Illustrated recipe)

Ingredients:
1 3/4 cups flour
1 teaspoon baking soda
1/2 teaspoon salt
6 very large bananas (peeled)
8 tablespoons unsalted butter
2 large eggs
3/4 cup packed brown sugar
1/2 cup walnuts, toasted and chopped (optional)
2 teaspoons granulated sugar

Instructions:
1.  Heat oven to 350 degrees
2.  Whisk flour, baking soda, and salt together in large bowl
3.  Place 5 bananas in a fairly large microwavable safe bowl; cover with plastic wrap; cut several steam vents.
4.  Microwave bananas on high until bananas are soft and have released liquid - about 4-5 minutes
5.  Place a fine mesh strainer over medium saucepan.  Pour contents of microwaved bananas into the fine mesh strainer.  Let the bananas drain for about 15 minutes while stirring occasionally.
6.  Cook the liquid on medium heat for about 5 minutes until there is about 1/2 cup to 3/4 cup liquid left.
7.  Dump the bananas from the strainer into a bowl, pour the banana liquid in with the bananas.  Mash until smooth.
8.  Whisk in butter, eggs, brown sugar, and vanilla into banana mixture.
9.  Pour banana mixture into the flour mixture and stir.  Mix in walnuts if using.
10.  Spray a 8 1/2 by 4 1/2 loaf pan with nonstick cooking spray.
11.  Pour batter into loaf pan.
12.  Slice the last banana into 1/2 inch thick slices.  Shingle slices on top of either side of loaf, leaving 1 1/2 inch wide spread down center to ensure an even rise.  Sprinkle granulated sugar evenly over loaf.
13.  Bake until toothpick inserted in center of loaf comes out clean  - 55 to 75 minutes.  Cool for 15 minutes.  Remove loaf from pan and continue to cool on wire rack.  Serve warm or at room temperature.

Mark's Notes
I never use brown sugar.  I substitute white granulated sugar for the brown sugar and it comes out fine.

This is the recipe that got me hooked on Cook's Illustrated.  The original recipe is called 'Ultimate Banana Bread' but sometimes I call it 'Extreme Banana Bread'.  Either way, I am referring to this recipe.

Here is a youtube video link of America's Test Kitchen making Ultimate Banana Bread (it's only 7 minutes)-
http://www.youtube.com/watch?v=DtokStgEQKM&feature=BFa&list=FLg1OP3AJZs6fi1lqFiYZqXw

Blueberry Banana Bread

There are several incredible things about Banana Bread.  One - it is one of the easier recipes to make.  Two - it has so many different variations.  Three - no matter what variation is baked, the house will smell divine.  I will start with the basic recipe I learned from the Betty Crocker cookbook.

Ingredients:
1 1/4 sugar
1/2 cup butter - softened
2 large eggs
1 1/2 cup mashed bananas (about 3 medium bananas)
1/2 cup buttermilk (or 1/2 cup plain yogurt or 1/2 cup regular milk)
1 teaspoon vanilla
2 1/2 cups flour
1 teaspoon baking soda
1 teaspoon salt
1 cup blueberries

1.  Mix sugar and butter in large bowl
2.  Stir in eggs until well blended
3.  Stir in bananas, buttermilk, and vanilla - beat until smooth
4.  Stir in flour, baking soda, and salt until moistened
5.  Stir in blueberries
6.  Grease loaf pan or pans -
 recommend either one 9 x 5 x 3 pan or two 8.5 x 4.5 x 2.5 pans
7.  Pour batter into pan or pans.
8.  Bake at 350 degrees  - 1 hour if using two pans, 1 hour 15 minutes for one pan
9.  Run a toothpick through it  - make sure it comes out clean - if not, cook a little longer
10.  Let cool for 10 minutes, remove from pans and let cool for two hours on wire rack.

FYI - Isopentyl acetate (IPA) aka banana oil - when the banana bread is baking, this is what you smell.  Banana oil evaportes very quickly when left at room temperature.  So, while the banana bread is baking and your home smells divine, you have this to thank and be sure to enjoy while it lasts.

Mark's Notes-
1.  Instead of adding in blueberries, I have added in the following:
1/2 cup chocolate chips (you can add more but it becomes too sweet in my opinion)
1/2 cup dark chocolate chips
1 cup frozen strawberries (I ran out of blueberries once and decided to go with the frozen strawberries we had in the freezer).
Some people add nuts for a banana nut bread.  The nuts will actually absorb any moisture in the bread.  In my opinion, that is too dry but some people like it and will simply enjoy a glass of milk with their banana nut bread.
If you just want regular banana bread, then don't add anything.  I would also suggest that you check out the recipe I have posted for Extreme Banana Bread.

2.  I very rarely have buttermilk in the house.  I usually substitute 1/2 cup buttermilk with 1/2 cup plain yogurt.  I have also read that you can substitute buttermilk with regular milk and adding in a few drops from a lemon.  1/2 cup regular milk will also work.

3.  Instead of using 2 1/2 cups regular flour, I have made it with 2 1/2 cups of whole wheat flour.  It's really good.  You can use any combination of regular flour and whole wheat flour.  

4.  I always forgot to take the loaf out of the pan after ten minutes, and I just let it cool in the pan for two hours.  It will actually bake a bit longer doing that but it comes out fine.

5.  Abby likes to pour the ingredients into the bowl while I stir.  Miriam likes to stir the ingredients while I pour those into the bowl.  Either way, it is great family fun.

So, with the bananas, blueberries, yogurt, and whole wheat flour mix that I use, it is very moist, extemely delicous, great family fun, and a wonderful snack / dessert for everyone over the next several days.

Mark's Kitchen Rules

I do have rules.  Rules for myself, rules for my kids, Abby and Miriam who love to help me bake, rules for everyone.  So, here are the rules:

1.  Wash your hands.
2.  Follow Directions
3.  Read over the recipe before starting
4.  Make sure you have all the ingredients
5.  Make sure you have all the cooking and baking utensils
6.   I do not use brown sugar, molasses, and certain types of cheese as Trish is allergic
7.   I do not cook with whiskey, vodka, wine, etc - I never have it in the house
8.  Try not to set off smoke alarm
9.  Thank Trish as she is running around behind me cleaning up
10.  Clean up kitchen when done.
11.  ...and most importantly - have fun!!  Cooking should be fun!!

Mark's Notes-
Wash your hands - before baking, during baking when handling raw eggs or raw meat, if the kids toddle off to do something else due to short attention span and come back to help bake some more, then they wash their hands.

Follow directions - applies more to the kids than me.  The next rule is more for me than the kids.

Read over the recipe in its entirety before starting -
I have gotten burned on this one a number of times.  Once at the very end of the recipe I had worked on all morning, it said to serve immediately.  I wasn't going to serve it until after dinner.  Another time, I was making a strawberry pie.  I thought the strawberry pie got baked in the oven.  Strawberry pies get stuck in the refrigerator for a couple hours and then you are to server shortly thereafter.  Still have not had much success with the strawberry pie - I will detail that adventure at another time.

Make sure you have all the ingredients before starting.  I don't know how many times I've started a recipe and then I get half way through it and realize I don't have all the ingredients.  Sometimes, I adapt and substitute something else, sometimes I go to the store, sometimes Trish will go to the store for me, and sometimes I have to just throw it away and try again later.

Make sure you have all the baking and cooking utensils.  I have not yet seen a cookbook that lists the types of pots, pans, dishes, glasses, etc. that you need to make the recipe listed in a similar fashion as the ingredients.  Do I need a muffin pan or a pie plate, do I need a dutch oven or a crockpot, do I need a regular frying pan or do I need a cast iron oven skillet?  I think that would be so helpful if recipes had a section labeled 'Kitchen Utensils' and listed everything you will need from measuring cups to whisks, to what type of bowls or pans you will need.  They list these out in the recipe.  Why not have a short list after the ingredients section?  That would actually be so helfpul for me.

I do not cook with brown sugar, molasses, and certain types of cheese because Trish is allergic.  This is another reason why I like to do my own cooking.

I also do not cook with vodka, whiskey, wine, etc.  I never have it in the house.  Some recipes call for adding some Jack Daniels or some Vodka or some wine.  There is no harm in baking with these items as it will dissipate while cooking.  I just don't have it in the house and I'm not going to go to the store and buy a bottle of whiskey just for a few drops of it.  I'll find a different recipe that doesn't use alcohol. 

Yes, the smoke alarm has gone off many times in my house as there is a smoke detector right there next to the kitchen.  I have even seen flames (small flames) in the kitchen that went out as soon as they started.  Still frightening to see that though.

When I bake, Trish will sometimes be running around behind me picking stuff up and wiping the counter down.  I sometimes get irritated if I'm scurrying around because I forgot something, but I should be thankful that she is cleaning up what is essentially my mess.

Then when everything is in the oven, then I will finish cleaning up everything in the kitchen and mopping up all my spills.  Just part of the cooking experience.

Welcome to Mark's Baking Adventures - 2015 Update

Pizza!  Good.  I have your attention.
When I was a kid, Friday night was Pizza night.  That worked out very well.  That way us kids always knew when we were going to have pizza, it was something to look forward to, it was a great way to start the weekend, and I got to bake the pizza. 

Real Estate!
Real Estate??  I hope I still have your attention.  How is real estate relevant to cooking?  I noticed that cookbooks have what I call a 'real estate' problem.  All their instructions are squished into small paragraphs with small print because they only have so much room in any given cookbook.  Their sentences are run-on sentences with no end as you do one thing then you need to do the next and move on and stir this while that is being microwaved and don't stir what you've been microwaving because you are stirring what will be added to what is in the microwave blah blah blah.  You get my point.  I have broken all my instructions down into simple steps.  I use simple sentences.  There may be 20 or 30 sentences and instructions.  I take the original recipe, and then I simplify it.  I break it down into simple steps.  I understand that most people can only do one thing at a time.  Multi-tasking in the kitchen is usually a recipe for disaster.  I hope you enjoy my style of writing recipes.

Molasses!  Good.  I still have your attention.
God has blessed me with a wonderful wife, Trish, and two daughters, Abby and Miriam.  After Miriam was born, Trisha's allergic reaction to molasses become worse and couldn't tolerate it as much as she once did.  So, now, I bake all types of fun stuff for her that are molasses free.  Molasses is in brown sugar and most syrups.  So, I never cook with brown sugar.  I always substitute white sugar and it causes no problems.

Ratatouille! 
That was a fun movie.  Anyone can cook!  Disney Pixar's Ratatouille came out in 2007 - the same year Miriam was born.  The same year Trish could no longer have molasses, brown sugar, or desserts from just about any place.  Anyone can cook!  And so I started cooking.

Banana Bread!
One of the first recipes I tried was Banana Bread.  It is very simple.  It is actually a lot simpler than I originally thought it was.  Then I was on vacation and I came across a Cook's Illustrated magazine and on the cover was a recipe for Ultimate Banana Bread.  I bought the magazine.  I made the Ultimate Banana Bread.  It was delicious.  Trish got me a subscription to Cook's Illustrated as a Christmas present.  I have learned that some of the Cook's Illustrated recipes are a bit involved but are well worth the trouble.  I also use other recipe books as well just to compare how two recipes can be done differently.

Facebook!  (it's a great program - I'm a Facebook addict)
For the past several years, I have been posting what I am baking in Facebook, posting recipes in Facebook's notes section, posting recipes and links in Pinterest.  I will continue to post in Facebook and Pinterest.  This blog will hopefully keep me more organized, allow me to go into more detail, provide anyone who might read this with ideas, and encourage people to bake more.  Also, I am going to be completely honest about what went right and what went wrong.  Sometimes, I will try a new recipe and it will be a complete disaster.  As these mishaps occur, I invite you to laugh with me as I laugh at myself. 

Abby and Miriam!
God has blessed me with two wonderful daughters, Abby (2004) and Miriam (2007).  The kids love to help me bake.  Abby likes to pour the ingredients into the bowl.  Miriam likes to stir the ingredients in the bowl.  It is great family time.  It is healthier to bake your own goods - I can pronounce all the ingredients as opposed to the ingredients on the food labels at stores.  It helps the kids with math.  Once Abby took a math test and she did extremely well.  I looked over the questions, and all the questions had to do with food or cooking.  Whenever we bake, we also listen to classical music (the family revolted the one time I tried listening to Shania Twain).  Abby and Miriam will hear a song playing and say, I heard that on 'Little Einsteins' or Abby will say, I heard that in music class.  So, it is healthy, educational, fun family bonding time, and when it is all done, we get to enjoy and share what we just baked.

Sometimes we listen to classical music.  Sometimes we listen to my cooking playlist.  These are fun songs that have something to do with food.  I list all the "cooking" songs in a different post.  Please check that out.

Blogging!
When I started this, I was new to blogging.  I just chose Google Blogger to start with.  It seems to work well.  My only complaint is that sometimes when I copy and paste my blog link into Facebook that it does not always bring in the correct picture.  I'll working on figuring out why it sometimes works and sometimes does not.

I do enjoy sharing my recipes with everyone which is one reason why I have this blog.  I welcome comments and suggestions.  I am always learning myself.  

Enjoy and Jesus loves you!!
At the end of every recipe, my last instruction simple says "Enjoy".  Now that I think about it, I will start adding, "Enjoy and Jesus loves you!"  My faith in Jesus is very important to me, and since I don't know who all will be reading this, I thought I'd share that wonderful simple message with whoever is reading. 

Hope you like my update.  Enjoy!!  Jesus loves you!!